Rabbit Control Legislation:The Pest Act 1954
- It is the responsibility of the occupier of the land to control rabbit populations. MAFF or DEFRA as it is now known, have the power to enforce this work.
- It is illegal to spread Myxomatosis.
- Specifies the type of spring trap and the setting thereof (within the overhang of the hole) and the trap must be visited at least once a day between sunrise and sunset.
Protection of Animals Act 1911
- This act makes it an offence to lay poison bait for rabbits.
Wildlife and Countryside Act 1981
- This act prohibits self-locking snares. Any other snares are to visited daily at dawn and at dusk.
- Snares are not to be set where there is a risk to other wild animals.
Ground Game Act 1880 (amended by Wildlife and Countryside Act)
- The occupier of the land, or one other authorised person is authorised to shoot rabbits at night (game licence not required).
Prevention of Damage by Rabbits Act 1939
- This act permits the use of fumigants in rabbit holes.
Control of Pesticide Regulations 1986
- Approved use of fumigants and repellents.
There are many points to consider when doing a gassing job for rabbits in what could be a public area or an industrial site, a site survey would cover the following considerations...
- Safety considerations and risk assessment including COSHH regulations.
- People on the site; employees, staff, business visitors, members of the public, school children.
- Animals; farm animals, domestic animals and wild animals.
- The nature, position and degree of infestation.
- Ownership of the site and it's surroundings.
- Status of the site with regards to public access or right of way, as this will affect public safety.
- Actions which may need to be taken to ensure public, employee/staff and any others safety.
- Timescale of the proposed control program and the reasons why the program is necessary in the first place.
Added to this you should also think of...
- The map reference for the site.
- The area of the site in hectares needing management.
- The status of the site e.g. Site of Scientific Interest.
- The names of any individuals or groups which need to be informed of the intended control program.
- Written versions of any permissions needed from any Third Parties such as English Nature etc.
Then you should also think of...
- The infestation present.
- Previous survey information if there is any.
- Records of any previous control measures carried out.
- Species causing the infestation.
- Degree of infestation.
There is a lot to think about as you can see, but let us assume that we have completed all the above, got our written permissions and everbody has been cleared away off the site. We have decided to carry out the treatment using "Phostoxin" (Aluminium Phosphide PH3)....so lets do it...
- The first thing we have to take into account is that Phostoxin is a fumigant and so we will require two men on site at least to do the job, this is required by Health and Safety, ideally three if the site is overgrown.
- Transportation of fumigants must be carried out by vehicles which have a seperate cab to the carrying part of the vehicle.
- Carriage of Dangerous Goods Regulations apply and a TremCard should be carried.
- Aluminium Phosphide is activated by damp or wet conditions hence treatments should not be carried out in wet weather.
- Do not use Phostoxin within 3 metres of any farm or dwelling buildings.
- Do not use in public places or alongside roads or paths open to the public.
- Children and livestock should be excluded from the treated area for 48 hours afterwards.
- Divide the area to be treated into distinct sections.
- Identify the wind direction and decide which burrows are to be treated first keeping holes already treated downwind. Work into the wind, selecting sections to be treated so that those already gassed are downwind of the next section.
- Walk over the area identifying all the burrows, this should have been done at the time of the survey, but it may apply that somebody else did the original survey, so make sure for your own peace of mind. Pay particular attention to "bolt" holes which could be hidden by overhanging grass or bracken/heather etc. Also disused holes which may contain dry leaves or detritus should be cleaned out so they are visible during treatment.
- Assuming that we are going to use a Phostoxin applicator, and starting with the holes furthest downwind, we insert the applicator into the hole and deposit one tablet. The other operator follow closely behind and seal each hole with a turf grass side downwards. Care must be taken not to drop soil onto the tablet.
- Continue to treat and block each hole systematically ensuring no holes are missed. Holes must be blocked thoroughly and covered with at least 15 cm of soil.
- When one section has been treated move on to the next section always moving upwind.
- Treated sections should be re-checked after 2 - 4 hours and any re-opened holes sealed. Remove and bury any rabbits found on the surface beside the re-opened holes.
- The maximum concentration of Phosphine is reached after 8 - 10 hours depending on temperature and humidity.
- Remove and bury any residual dust from the applicator before storing and transporting.
- Follow-up after 48 hours and retreat any holes which have been opened up.
The Health & Safety Executive issue an agricultural information sheet Number 22 outlining the procedures which should be taken when gassing.
Fencing is a humane and environmentally acceptable method of reducing crop losses caused by rabbits. The increasing number of enquiries from farmers about the cost-effectiveness of different types of rabbit proof fences resulted in the Central Science Laboratory (CSL) of the Ministry of Agriculture, Fisheries and Food (MAFF) now known as DEFRA initiating a research program in 1980.
Where should fencing be used? Fencing is a particularly useful method of protecting crops where rabbit burrows are inaccessible and therefore where measures such as gassing rabbits in their burrows, the most effective way of reducing their numbers, cannot be used. Burrows can be inaccessible because they are located in dense vegetation, which farmers may be reluctant to clear owing to conservation or game interests, or because they are located on neighbouring properties. Fences should be erected along the boundary between the field to be protected and the infested harbourage. If the field is not to be completely encircled, the fence should be extended beyond the end of the infested harbourage by at least 150 metres at each end. Either wire-mesh netting fences and electric fences can be used. There are two types of electric fence: the electric netting fence and the strained wire fence, a scaled down version of the type used to control cattle. Both types of fence can be electrified by the same energiser.
Electric Fence Precautions:
- If you are not sure whether there are telephone lines nearby (they may be laid underground), you should consult your local British Telecom office before you erect the fence: electric fencing can cause interference on telephone lines.
- You should avoid erecting these fences beneath overhead power cables. If this is unavoidable, the supply company should be consulted.
- Careful consideration should be given to the erection of electric netting fences near ponds with frogs or toads, particularly natterjack toads which are protected and a rare species, as contact may kill them.
- Warning notices should be attached to the fence at least every 100 metres where the fence runs alongside a public footpath or in fact anywhere where the public may have access.
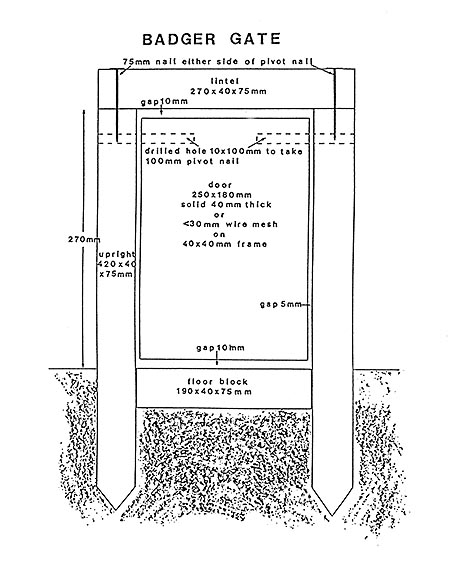
Badger Gates: From time to time, wire netting fences erected to exclude rabbits can be damaged by badgers, especially if the fences are erected across the badger runs and this damage can often provide rabbits with a means of access to crop fields. If badger gates are to be erected then the runs need to be identified at the same time as the fence line is determined. The woodwork of the gate should be treated in the same manner as the fencing posts thus giving both the same life expectancy. When the netting is erected a gap should be cut in it at the point where the run crosses the fence line. The gap should measure about 200 mm across and 270 mm high; these dimensions provide the small overlaps needed for stapling the netting to the frame of the badger gate. Where spring steel straining wire is used to support the netting, sods should be put under the ground level wire across the run so that the wire is at ground level and can be earthed over. For a week nothing else should be done but the fence should be checked daily for signs of damage and to see if badgers are crossing the gap.
The next stage is to lay the floor which should be a block of wood 190 x 40 x 75 mm (see drawing below). This block should be placed just below soil level and replaces the sod under the ground-level line wire. The line wire should be stapled to the block. Block and line wire should again be earthed over. In the course of the next few days, badgers passing through the gap will wear away the covering soil but should accept the wired block. A second week should be allowed to pass with daily checks to ensure that the run and gateway are in use.
If all is well, the drilled uprights complete with the lintel should be driven in either side of the floor at the beginning of the third week and the netting stapled around the uprights and the lintel. This frame should be driven in to provide a gap 270 mm high and 190 mm wide (see drawing below). During the next week the gateway should be observed and if use continues, a wooden half-door can be suspended from the top of the frame, swinging freely from nails through the holes drilled previously in the uprights. Provided use continues, a full size door, which will weigh about 1.1 kg and measures 180 x 250 x 40 mm, can be hung after another week. This door will allow badgers but not rabbits to cross through the fence. The door should have a 5 mm gap at the sides and 10 mm gaps at the top and bottom around it to ensure that it will continue to swing freely whatever the weather. The door can consist of a wood frame of 40 x 40 mm timber covered with wire mesh not more than 30 mm in mesh size.
© Stuart M Bennett 2001